Tuesday 20 January 2015

How To Disable Windows 8.1 Startup Programs

How To Disable Windows 8.1 Startup Programs

In previous versions of Windows, you can help it start up faster by disabling startup programs with Task manager. You can still do it in Windows 8.1, but the process is different. Task Manager has been revamped since the days of Windows 7, and disabling startup programs is easier, plus more information about the apps and programs is provided.
While Windows 8.x does boot noticeably faster than Windows 7 and earlier, you can make it boot even faster by disabling startup programs.

Note: This article has been updated to reflect the changes from Windows 8 to Windows 8.1 update 1.

Disable Windows 8.1 Startup Programs

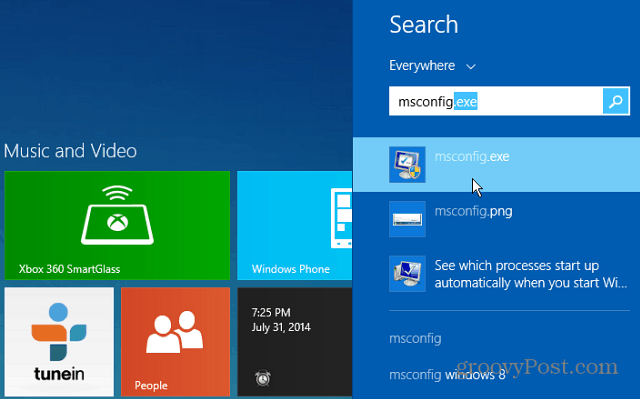
There are, of course, a couple ways to get to the same place with Windows, and that’s no different in Windows 8.1. First, from the Modern Start screen type: msconfig and hit Enter.
Start Screen
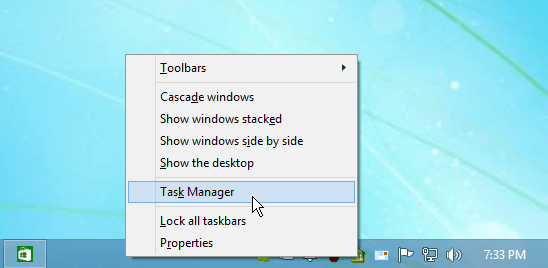
Or from the desktop, just like Windows 7, right-click the Taskbar and select Task Manager.
Taskbar
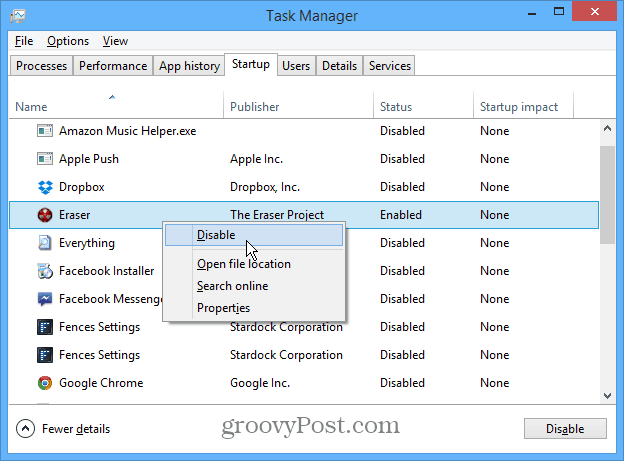
Either way you do it, the new Task Manger will open on the desktop. Click the Startup tab to see the items set to run when you boot your system. Right-click on any of the programs to and click Disable.
The program will still appear on the list, but the Status will change to Disabled. Right-click an app again and select Enable to have it run during startup.
Disable
Notice that when you right-click a program in under the Startup tab, you’ll see more options. This allows you to get a better understanding of what each program is or does before you disable it.
I find the option to search for the program online to be particular beneficial. We’re all guilty of installing desktop programs or apps, using them once, and after a year you have no clue what they are.
For more details, check out our guide on new features available in the Windows 8.x Startup tab in Task Manager.


Thursday 1 January 2015

How to Make Bootable USB Without Any Software Support


Right Click on Command  Prompt -> Run As Administrator -> Give Administrator Credentials if it is Prompted -> Switch Caps Lock ON -> Type DISKPART and Press Enter
After Entering into DISKPART Follow the Instructions or Commands Shows in  Below Image.

After Exiting from Command Prompt or DISKPART Extract Windows 7 or Windows 8 ISO Using Winrar and copy extracted folder files into pendrive. After completion of the copying files restart the pc or laptop and slect boot option as USB Mass Storage or USB or Pendrive.

Sunday 5 January 2014

.net framework 2.0 offline free download

Microsoft .Net Framework v2.0 Free Download

If you are using Windows XP operating system, is expected to install .Net Framework 2.0 or later version to be able to run a particular application. However, if you are using Windows Vista or 7, you do not need to install. Net Framework 2.0.
microsoft .net framework 2.0 free download,microsoft .net framework 2.0 download,download microsoft .net framework 2.0,.net framework 2.0 free download,download microsoft .net framework 2.0,download .net framework 2.0,.net framework v2

There are several ways to perform the installation, by downloading but we have to connect to the Internet again to download their packages complete. In this way each of us had to repeatedly download the install package. It must be very inconvenient and time-consuming, and sometimes there are problems with the Internet connection is not stable. The worst thing that can happen in such a manner is the connection is lost, then we have to start again from scratch, because the file is quite large.

The other way is to do the download. NET Framework 2.0 full installer, which can be installed in Offline, without having us connected to the Internet. So where we can download .NET Framework 2.0 Offline installer?

.Net Framework 2.0 Free Download

Don't worry I will give it for free. Maybe of you ever tried to find it and find it difficult to find the Microsoft .Net Framework 2.0 download link, if it were possible to get a beta version which is not yet perfected. The link I gave is the official link, so the file is not modified. Okay on with it if you want to download microsoft .net framework 2.0 can simply click on the following link:
.NET Framework 2.0 SP 1 (x86) (23 MB)
.NET Framework 2.0 SP 1 (x64) (46 MB)
.NET Framework 2.0 Redistributable Package (x64) (45 MB)
.NET Framework 2.0 SP 2 (x86) (23 MB)
.NET Framework 2.0 SP 2 (x64) (46 MB)
.NET Framework 2.0 SP 2 (ia64) (52 MB)
Alternate link to download. NET Framework 2.0

 Update: If you are looking for Microsoft .NET Framework 3.5 please click here.

And make sure you've done the activation windows, or at least you have your windows serial activation, but for those who use the Windows piracy was still able to install it.

Hardware requirements of Net Framework 2.0

Net Framework v2 requires 400 MHz of Processor, RAM size is recommended to use 256 MB. And for its installation requires 500 MB of free space.

System requirements of Net Framework 2.0

Microsoft .Net Framework 2.0 has support for client operating systems such as Windows 2000 SP 4/ XP SP 2. And it also supports the server operating system is Windows Server 2003

Tuesday 31 December 2013

How to Resolve Genuine Windows Error in Windows XP

First Method
1.    Lauch Windows Task Manager.
2.    End wgatray.exe process in Task Manager.
3.    Restart Windows XP in Safe Mode.
4.    Delete WgaTray.exe from c:\Windows\System32.
5.    Delete WgaTray.exe from c:\Windows\System32\dllcache.
6.    Lauch RegEdit.
7.    Browse to the following location:
HKEY_LOCAL_MACHINE\SOFTWARE\Microsoft\
Windows NT\CurrentVersion\Winlogon\Notify
8.    Delete the folder ‘WgaLogon’ and all its contents
9.    Reboot Windows XP.
Note: With this method, you may be prompted to install WGA Notifications again which can still be unselected.
Second Method
Another alternative suggested by dman is by using System Restore to restore the PC to a previous restore point that WGA Notifications hasn’t kicked in, and then carefully stop KB905474 from been applied to the system. To use System Restore, go to Start -> All Programs -> Accessories -> System Tools -> System Restore.
Note: Again, you may be prompted again to install WGA Notification, so it must be bypassed.
Third Method updated
This method involves using a cracked version of LegitCheckControl.dll to replace the original copy of LegitCheckControl.dll, and thus bypass the WGA validation and make Microsoft believes that your copy of Windows is genuine. To get rid of WGA Notifications warning messages, the patched version of WgaLogon.dll and WgaTray.exe to replace the existing files.
To apply the patch by replacing the files manually, try to end the respective processes in the Task Manager before deleting the existing files. Most likely is you will have to restart your PC in Safe Mode in order to replacing the original copy of LegitCheckControl.dll and related files. However, there has been automatic updater and even cracked WGA installer that automatically apply the patched version of WGA files.
Latest Update for WGA version 1.5.708.0 latest
Download cracked and patched version of LegitCheckControl.dll with thanks to Danny.
Latest Update for WGA version 1.5.554.0 latest
Download cracked and patched version of LegitCheckControl.dll, WgaLogon.dll and WgaTray.exe for v1.5.554.0 of Windows Genuine Advantage Validation Tool and WGA Notifications.
John suggested that it may be rolled out to reduce the frequency of ‘phone home’ feature. BetaNews has confirmed this and says Microsoft has completed the pilot phase for WGA Notifications, officially rolling out the anti-piracy reminders to Windows XP users worldwide. Anyway if Notifications Tools is patched, it won’t callbacks at all. Swissboy found that now there are 15 languages supported for KB905474 and offers solution.
General release version of Windows Genuine Advantage Notifications also has updated EULA which says installing of this update is optional. However, once installed, the update will become a permanent part of your Windows XP software, means you can’t uninstall it. The EULA also confirms that information about your system will be sent to Microsoft. You can just skip installing the KB905474 by clicking “I Decline” when shown the EULA. If you don’t want the Automatic Updates or Windows Updates to try install WGA Notifications again, click Don’t ask me to install these updates again at Decline EULA window.
Latest Update for WGA version 1.5.532.2
Version 1.5.532.2 of WGA Validation Tool and WGA Notifications is NOT YET mass released to all Windows system, so your system may not have this version.
WindowsXP-KB905474-ENU-x86-1.5.532.2-noWGA.exe (as suggested by swissboy) is the original setup of KB905474, but with the 3 files as mentioned above replaced with patched version and re-packed. You can view the contents with WinRAR or 7-Zip. Download . (Removed due to compliant from Microsoft)
LegitCheckControl.dll-v1.5.532.2-Jun-02-2006.zip (as suggested by swissboy) contains hacked version of LegitCheckControl.dll which you have to replace manually over the existing dll in \Windows\System32 folder. Download . (Deleted due to complaint from Microsoft)
new More automated WGA removal tool: RemoveWGA
Latest Update for WGA version 1.5.532.0
LegitCheckControl1.5.532.0.muiz.fixed.rar (suggested by Picard) is the patched LegitCheckControl.dll and can be download  (removed due to complaint from Microsoft).
If LegitCheckControl.dll alone doesn’t work, try to patch the other two WGA files too, namely WgaLogon.dll and WgaTray.exe. Download the the patches for 3 files  (Removed due to complaint from Microsoft). Overwrite the original files with these hacked version in \Windows\System32 folder. The patch should remove notifications nag screen and allows Windows Update.
There are also several automated tools that save the dirty works of have to manually overwrites and replaces the WGA applications.
WGAPatch905474 (suggested by SilverBullet) contains 905474.exe that will patch Windows to allow access to full (custom) Windows Update and get rid of nag screen. Download 905474.exe  (removed due to complaint from Microsoft).
There are also several patched WGANotify KB905474 installation setup which will install KB905474 WGAnotify with the 3 patched WGA files namely LegitCheckControl.dll, WgaLogon.dll and WgaTray.exe. One of them is HotFix windowsxp-kb905474-enu-x86.exe suggested by DeaDMan Walking, which will after install, disable notifications nag screen and allows update. Download  (removed coz of Microsoft complaint).
WindowsXP-KB905474-ENU-x86-v1.5.532.0-noWGA.exe (suggested by Swissboy) is also the patched KB905474 setup file which is actually the original setup of KB905474, but with the 3 files replaced. Download it  (removed due to Microsoft compliant).
Old Updates
Version 1.5.530.0 of cracked LegitCheckControl.dll (suggested by chucko), can also be downloaded  (obsolete links, visit here for updates).
Use the latest cracked LegitCheckControl.dll by searching for “Windows.Genuine.Advantage.Validation.v1.5.526.0.CRACKED-ETH0″. Can also be downloaded  (obsolete link, update here). Cracked LegitCheckControl.dll also available here or here (obsolete links, updates available here). Once download the cracked dll, replace the LegitCheckControl.dll in \Windows\System32 folder with the cracked version. You may need to restart your PC in safe mode to replace the files.
Forth Method
Jules found that by disabling and renaming the files ‘WgaLogon.dll’ and ‘WgaTray.exe’ in C:\WINDOWS\system32 folder by using the program Unlocker seems to get rid of all the nags/popups.
Fifth Method
Clear the contents or create a new empty data.dat for WGA, and make data.dat Read-Only and Hidden as detailed here.
The following step basically is the same with the above data.dat method, only different is that you no need to create any file in the WGA data folder:
1.    Launch Windows Explorer and go to C:\Documents and Settings\All Users\Application Data\Windows Genuine Advantage\data
2.    Go to Tools -> Folder Option -> View.
3.    Select (click) Show Hidden Files and Folders option.
4.    Unselect (uncheck) Hide Protected Operating System Files option.
5.    Click OK.
6.    Delete everything in the data folder.
7.    Right click on data folder, and select Properties.
8.    Select (Check) Read-Only as the folder’s atributes.
9.    Click OK or Apply.
Update: After 30 May 2006 with the release of WGA 1.5.532.0, this method no longer works. If the data.dat is set to “Read-Only”, WGA may complains that the serial key from the file could not be read, making the WGA validation failed even with the cracked dll files. So just delete the file (and make sure the folder is not set to “Read-Only”), WGA will then automatically regenerate the file and create the key, so you will pass the validation if you have the correct patched dll installed.
Sixth Method
Another alternative suggest that three files are installed Windows XP System Folder for WGA:
\WINDOWS\system32\WgaLogon.dll
\WINDOWS\system32\WgaTray.exe
\WINDOWS\system32\LegitCheckControl.dll
The wgatray.exe process makes the check for genuine windows software. If WgaLogon.dll is denied execution right, that WinLogon is unable to call it to check on Windows validity and display notification package at boot, and since WgaLogon is also responsible for running and maintaining WgaTray.exe, no more tray popups either.
To change and disable the execute bit of WgaLogon.dll:
1.    Turn off Simple File Sharing in Tools -> Folder Options -> View tab.
2.    Right click WgaLogon.dll in Windows Explorer and open the Security Tab.
3.    Click Advanced button.
4.    Uncheck the Inherit box at the bottom.
5.    Click the Copy button.
6.    Click OK.
7.    Go through each listed user/group and remove the “Read & Execute” permission for WgaLogon.dll, leaving the “Read” permission as-is.
8.    Click OK to apply the permission changes.
9.    Close the file properties dialog.
10.    Restart the computer.
11.    Turn “Use simple file sharing” on (optional).
Optionally, steps suggested by PSNet which has the same effect - disabling WgaLogon.dll.
Hidden files
Method 1:
Go to registry editor by running regedit in the run box.
Go to this key:
HKEY_CURRENT_USER\Software\Microsoft\
Windows\CurrentVersion\Explorer\Advanced
In the right hand area, double click hidden and change the value to 1.
Now you’re all set to go. Check it in your tools menu if the changes have taken effect.
Method 2: (By Random Hajile)
1.    Click “Start” -> “Run…” (or press Windows key + R)
2. Type “regedit” and click “Ok”.
3. Find the key: HKEY_LOCAL_MACHINE\SOFTWARE\Microsoft\Windows\CurrentVersion\Explorer\
Advanced\Folder\Hidden\SHOWALL
4. Look at the “CheckedValue” key… This should be a DWORD key. If it isn’t, delete the key.
5. Create a new key called “CheckedValue” as a DWORD (hexadecimal) with a value of 1.
6. The “Show hidden files & folders” check box should now work normally
Removing the welcome logo when starting Windows XP
Here is a simple tip on how removing the XP logo and speeding up Windows XP booting time.
1. Select My Computer icon and right click on it.
2. On the menu select the Properties option.
3. On the System Properties window select the Advanced Tab.
4. Click on the settings option and then select the Startup and Recovery option.
5. Click on the Edit button.
6. The Boot.ini file should be listed on your notepad
7.At the end of the text (after fastdetect) type /noguiboot
8.Save the file with these modifications
9.Close the Startup and Recovery window by clicking on the OK button
10.Do the same to close the System Properties window
11.Restart your Windows XP to see the difference
Note that if you want to revert the changes just remove the “/noguiboot” from step 7 and save the file.
Folder Options Missing in Windows XP & Restoring Folder Options in Windows XP


http://www.daniweb.com/forums/thread18600.html

[HKEY_CURRENT_USER\Software\Microsoft\Windows\CurrentVersion\Policies\Explorer]

"NoFolderOptions" field set to '1' to '0'.

Go to Start –> Run, type Regedit.
Go to HKEY CURRENT USER / SOFTWARE / MICROSOFT / WINDOWS /
CURRENTVERSION / POLICIES / EXPLORER
You will find a DWORD value “NoFolderOptions” and its value as “1“.
Change its value from ” 1” to “0“.

                                                    OR


HKEY_LOCAL_MACHINE/SOFTWARE/Microsoft/Windows/Current Version/Explorer/Advanced/Folder/Hidden/SHOWALL

3- In the right panel double click on "CheckedValue" and change value from 1 to 0. Click ok and then exit Windows Registry Editor and restart your computer.
4- Now open Folder Option ( My Computer > View menu > Folder Options)
5- Go to the View tab, in "Hidden files and folders" section, check "Show hidden files and folders" and then close Folder Option. In future you won't see " Show hidden files and folders" in Folder Option.


How To Restore Desktop Dhortcut Icon in XP

restore "Show Desktop" icon in Quick Launch toolbar, today I decided to write this small tutorial.

Most of the times most of the ppl make this mistake when they delete the "Show Desktop" icon from Quick Launch toolbar either accidentally or intentionally. After some time they might want to restore this useful icon which helps in minimizing all opened windows in a single go. Although you can do the same thing using keyboard shortcut key "Win+D" or "Win+M".

So in this tutorial, I'll tell you a few way to restore "Show Desktop" icon in Quick Launch toolbar:

METHOD 1:

1. Paste following code in Notepad and save the file with name "Show Desktop.scf" (including quotes):

[Shell]
Command=2
IconFile=explorer.exe,3
[Taskbar]
Command=ToggleDesktop

2. Now you have to copy this new file and paste in "Quick Launch" toolbar. You can do it in 2 ways:

A. Drag-n-drop the new file to Quick Launch toolbar.

B. Type "%appdata%\Microsoft\Internet Explorer\Quick Launch" in RUN dialog box and press Enter. It'll open Quick Launch folder. Paste the file in this folder.

METHOD 2:

1. Open RUN dialog box and provide following command:

regsvr32 /n /i:U shell32.dll

2. It'll restore the Show Desktop icon in Quick Launch toolbar. You might need to restart your system to take effect.

Saturday 28 December 2013

IE Dont Send Error in XP

Have you ever been browsing the Internet using IE happily until all of a sudden you get this horrid “Internet Explorer has encountered a problem and needs to close” error message, after which IE completely shuts down and you lose all of your tabs along with any forms you might have been filling out? Now that I use Firefox religiously, this has not happened to be even once, but it happened all the time with Internet Explorer.
So for those poor souls still using IE 6 or 7, here’s a quick list of steps you can take to try and fix the underlying problem. The cause of this error can be any number of things, so you may have to try a few things before it actually fixes the problem. Your error may look something like this:
Error sign
AppName: iexplore.exe AppVer. 7.0.5730.11 ModName: unknown
ModVer: 0.0.0.0 Offset: 61eb77e0

internet explorer
So what the heck to do if you get this error? Try each one of these steps and see if the problem goes away:
  • Open IE, go to Tools, Internet Options, and clear out the temporary Internet files. Click Delete All and choose the option to delete all offline content also. In case you downloaded some executable file that is causing the problem, this will remove it.
  • Run anti-spyware and anti-virus software on the computer
. Download Adware and Spybot and run each to remove any malware. Also, download CCleaner and HiJackThis and run both applications
. Remove unwanted entries that you see when you run HiJackThis (you’ll have to read the docs to know what to remove).
  • Go to Start, Run and then type in MSCONFIG. Click on the Startup tab and uncheck all items and then re-start the computer. This disables all startup programs from running. If you still get the error, go ahead and turn them back on the same way.
  • Disable Smarts Tags in Internet Explorer by going to Tools, Internet Options, Advanced tab, and then clearing the Enable Smart Tags check box.
  • Install the latest updates from Microsoft Update web site. If you started receiving this error AFTER installing the latest updates, you will have to perform a System Restore to the point before you installed the updates. You can access the System Restore feature by going to Start, All Programs, Accessories, and then System Tools.
  • Use System File Checker to scan for changes or modifications to Windows protected files. If any files were overwritten or deleted, etc, SFC will automatically retrieve the correct version of the file and replace it. You can run SFC by going to Start, and then Run, typing in CMD and then typing sfc /scannow in the command window.
  • Re-register Internet Explorer DLL files. Click on Start, then Run, type in CMD and then type the following lines and press Enter after each one:
regsvr32 softpub.dll
regsvr32 wintrust.dll
regsvr32 initpki.dll
regsvr32 dssenh.dll
regsvr32 rsaenh.dll
regsvr32 gpkcsp.dll
regsvr32 sccbase.dll
regsvr32 slbcsp.dll
regsvr32 cryptdlg.dll
  • Disable all third party addons to Internet Explorer by going to Start, Control Panel, Internet Options, Advanced tab and then un-checking the “Enable third party browser extensions” check box. You will have to scroll down a couple of lines.
Hopefully if you’ve been getting this error, one of these methods mentioned above will fix the problem. If you have questions about how to perform a step, please post a comment and I will try to help you out! Enjoy!
[tags]internet explorer, internet explorer needs to close, internet explorer encountered a problem, internet explorer error, IE shuts down, IE closes unexpectedly[/tags]

Another Solution for IE Dont Send Error


logg on Root


click START/RUN/(Type in)services.msc/(Find Error Reporting Services)Right click/PROPERTIES/START UP TYPE/ DISABLE/OK/APPLY....then reboot.